Tuesday, December 31, 2013

The Best Homemade Sugar Cookies You Will Ever Make

One of the things I love to do every holiday season with Landon is make Christmas cookies, so thought I'd finally get a good recipe up on the blog for reference. After trying many different recipes and making a few alterations, this is definitely my 'go to' recipe for sugar cookies & icing now. Trust me, you will love these! They are great for any occasion and fun indoor activity to do with the kids, and you likely already have all the ingredients in your house already. I definitely recommend making your own icing too because that's probably the best part about these. This recipe is really easy to follow and practically impossible to mess up, and the cookies come out absolutely amazing, & especially great for cookie cutting or cookie bouquets. 

20 minute prep time, 8 minute bake time, & yields about 5 dozen cookies.

What You'll Need:
- 4 large eggs
- 1 1/2 cup coconut oil (or 1 1/2 cup butter)
- 5 cups flour (I've done this with half almond flour and they came out amazing)
- 3 cups sugar
- 2 tsp vanilla extract (ran out of vanilla extract in the past and these still taste amazing without it)
- 2 tsp baking powder
- 1 tsp salt

For the Icing:
- 4 cups confectioners' sugar
- 1/2 cup coconut oil or vegetable oil (or softened butter)
- 5 tablespoons vanilla almond milk (or regular milk, but the vanilla almond milk tastes awesome)
- 1 tsp vanilla extract (optional - I've done it with and without)
- optional food coloring

Directions:
1. In a large bowl, cream together butter or oil and sugar until smooth.
2. Beat in the eggs and vanilla extract.
3. Stir in the flour, baking powder, and salt.
4. Cover, and chill dough for at least one hour (or overnight).
5. Preheat oven to 400 degrees F.
6. Roll out dough on floured surface about 1/4 inch thick.

7. Cut into shapes with cookie cutters & place cookies an inch apart on ungreased cookie sheets.

8. Bake 6 to 8 minutes in preheated oven. Cool completely.

For the Icing:
1. In a large bowl, cream together the confectioners' sugar and oil until smooth, the mix in the milk and vanilla extract until smooth.
2. Add in food coloring or sprinkles.


Friday, December 27, 2013

Zoolando Xmas 2013: the best day ever

Went to the Brookfield zoo last weekend for the first time and think I can safely say it was the best day of my 2013. Well, second best day. Got there early in the morning before the crowds and pretty much had the whole place to entirely to ourselves. Blair slept through most of it, and Landon for the first time ever was so excited to see all the animals we read and talk about on a daily basis. He was most excited about the zebras, dolphins, and tigers, and his very own hot chocolate and dippin' dots (first timer). And I loved being able to take the time to read all the interesting fun facts and not feeling rushed or overwhelmed with losing my kid in the crowds. We stayed just until it started to get dark when the entire zoo was lit up with Christmas lights and it was so beautiful. Really hope to get back there again soon and make it a more regular weekend occurrence. A few photos I managed to capture:


Wednesday, December 18, 2013

Delicious Mulled Wine Recipe


Hosting Christmas this year? Get ready to wow all your friends & family with this delicious, hot mulled wine. My mom used to make this all the time for the holidays and it fills the house with an awesome aroma and tastes AMAZING! & guess what else -- It is GOOD for you! All the healthy properties in the spices give you a holiday drink you can actually feel good about drinking, loaded with vitamins & antioxidants. So bottoms up! ;)

The following recipe serves 2-3 if you just want to cuddle up with your honey in front of the fireplace, but whenever I make this I typically double the recipe to serve 4-6. 

Prep time = less than 5 minutes and cooking time = 25 minutes.


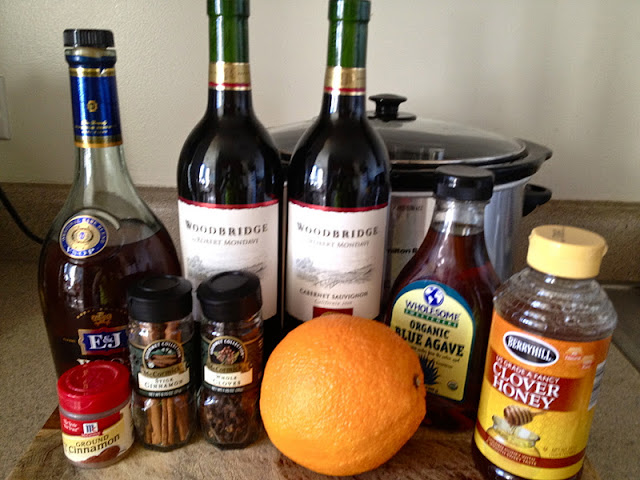
What You'll Need:
- 1 (750 ml) bottle of red wine (I prefer cabernet sauvignon. You can also try merlot or Zifandel. Honestly, cheap red wine is the best for this).
- 1/4 cup brandy
- 1 sliced orange. keep orange rinds on for zest.
- 10 whole cloves
- 2 tsp ginger
- 3 cinnamon sticks
- 2/3 cup sugar, honey, or agave syrup. I would recommend sugar or agave because they dissolve much easier than the honey, but whatever your preference. The agave is an all natural sweetener made from agave nectar and 25% sweeter than sugar, so you can use a little less. 

Directions:
1. Puncture/stick all the little cloves randomly into the orange slices. They stay in the orange the whole time it cooks to add flavor...and so no one chokes on a clove.
2. Combine all ingredients into a crock pot or slow cooker.
3. Warm ingredients on low to medium heat. AVOID BOILING or else you will lose the alcohol content.
4. Cook for roughly 25 minutes to an hour, stirring occasionally to dissolve all the sugar/honey/agave. You want to mull the spices & wine for a minimum of 20 minutes for all the ingredients to infuse together, and can keep it mulling on low heat for up to an hour. (It will give your home an absolutely amazing aroma!) Don't mull it for over an hour though, or else the spices may start to turn a bit bitter.
5. When wine is steaming it is ready to serve. Garnish with a cinnamon stick. Enjoy!

Thursday, December 12, 2013

DIY Handprint Wreaths

Another fun and very quick (under 5 minutes) Christmas craft, these adorable handprint wreaths. All you need is a green stamp pad (make sure you have the washable kind for easy clean ups), a small stretch of red ribbon, and paper. You could also do this on a canvas or a handkerchief or whatever else you have in your little craft stash. I used a thick card stock letter paper for Landon because his hands were too big for my 6x9" canvas, but using paper will also allow you to hole punch the corners and tie some red and white twine to hang and display. 


Wednesday, December 11, 2013

DIY 12 Days of Christmas

                                 
A fun idea and pretty decoration to have hanging in your home for the holidays -- The 12 Days of Christmas filled with your holiday traditions/fun stuff you do during Christmastime. You can really make this however you want, I made ours on a canvas (as an alternative you can use large card stock paper) and only other supplies you need are: some festive holiday craft paper, stencils, ribbon, hole punch, glue, & photos.
Our activities:
1. Open presents!
2. Kiss under the mistletoe
3. Watch Alvin & the Chipmunks
4. Game night in :)
5. Put up the tree!
6. Meet Santa
7. Make an ornament with the kiddos
8. Watch Elf
9. Bake Christmas cookies
10. Hot cocoa in front of the fire
11. Watch our wedding video
12. Have a pajama party 

;)

Tuesday, December 10, 2013

DIY Salt Dough Christmas Ornaments :)

I haven't been wanting to leave our warm toasty house in this brutal, brutal cold front we've been having, esp with a newb + tot in tow, so I'm planning our week of hibernation with a bunch of different Christmas crafts to keep my busy little guy occupied. I'll be posting them up on the blog as I go but first am sharing a repost of these DIY salt dough Christmas ornaments. This was originally published last November and quickly became the most re-pinned image from my blog so I'm throwing it up here again for anyone who missed it, or anyone who maybe didn't have kids or kids old enough to do this with last year. This batch yields a ton of ornaments (about 25-30, depending on the size of your cookie cutters) so I have a few hung up on our tree and then gifted most of the rest out to L's friends & relatives. Cause we're all about home-made gifts with love :)

Here's What You'll Need:
- ½ cup salt
- 1 cup flour
- ½ cup water
- Rolling pin
- Cookie sheet
- Toothpick
- Miniature cookie cutters: stars, Christmas tree, hearts, whatever your heart desires. We also made baby elephants.
- Acrylic paints: Whatever colors you want your ornaments to be
- Glitter glue or glitter paint (optional)
- ribbon

Directions:

1. Preheat the oven to 250 degrees F.
2. Mix together, salt, flour, and water until dough is formed.
3. Knead the dough on a floured surface until the mixture is elastic and smooth. If dough is too sticky, sprinkle with flour, continue to do so until stickiness is gone. Do not add too much flour, this will dry out the dough and will cause it to crack before you get a chance to bake it.
4. Roll out the dough to about ¼'' thick with a rolling pin that has been dusted with flour.
5. Use cookie cutters to cut out your ornaments.
6. Use a toothpick to make a hole toward the top of the shape. Poke the toothpick into the shape, then holding toothpick straight up and down, make a circular motion as if you were stirring something.
7. Place all shapes onto an ungreased cookie sheet and place into the preheated oven.
8. Bake for 2 hours.
9. Remove from oven and allow to cool completely.
10. Paint!
*Tip: Use the handle end of the paint brush to paint dot ornaments on your trees.
*Optional: When paint is dry, use glitter glue or glitter paint to put a sparkling cover coat on your ornaments.
11. When dry, thread ribbon through hole and tie in a knot in the back.
Happy Christmas Crafting! :)

Monday, December 9, 2013

la la la links to love

Things have finally started to get back to normal & settle down, just in time for the craziness of the holidays :) L is back on his nap/bedtime schedule, eating better, speaking better, & acting like the little gentleman we all know & love him to be. & little B is ... well, basically continuing to be the little angel baby that she is. I've made it out solo on several different occasions with both kiddos while Chris has been in New York for the past 4 days & started to feel like I got this whole mom of two thing under control. I know this blog has not been getting very much love & attention lately so thought I'd drop in & share a few sites I've been perusing & links I'm loving lately.. Happy Monday!

- I've been really enjoying lots of quiet, skin-to-skin time with my precious little bundle, but holy crap, I never knew all the amazing benefits of it. Check out this easy to read one-pager from nuroobaby & get that baby against your chest!
- This post from MelVfit's blog about 'faking' body transformation, and particularly loving Jen's post from mamalionstrong, on post-partum body image and the toll, and beauty of, motherhood. 
- & in honor of "Small Business Saturday"this past Saturday, sharing a few small etsy shops I adore: Oanabefort, Ohnorachio, & thelilcupcake.
-  I've been thoroughly enjoying breastfeeding my little Blair bear, (something I wasn't able to do with Landon, & man was I missing out), & love always learning new facts about why Breast is Best
- Blair's nursery was featured on the well known and very well loved Apartment Therapy site this past Thursday - check it out!
- Receiving some incredible feedback from my Extract shop and thrilled that almost all of my customers have been back for re-orders of my custom facial oil cleanser. Thinking about ways to actually advertise, promote and get out there now. If you are a blogger and would like to host a product review, let me know! (mummascorner@gmail.com)
- Loving Rifle Paper Company, just ordered this iphone case for myself (a close runner up). Also obsessed with her stationary and beautifully illustrated note cards...I found these "B" notecards on clearance bin at Anthropologie, & made a beautiful keepsake for Blair's baby prints :)
-& lastly, This post by Matt Walsh on SAHMs, love. 


Monday, November 25, 2013

Landon (& Life) Lately

I am on about a combined 3.5 hours of sleep, so forgive me if I'm all over the place here.

So much about my life has been consumed with Blair, really ever since we found out we were pregnant, but especially since her birth (2 weeks ago today). I haven't been spending a tenth of the amount of time I used to spend with Landon these past 2 weeks and I have to admit, it's been really challenging, for me and for him. 
Blair is truly an angel baby, she's nursing like a champ, barely even cries (I know), and although she is up (a lot) feeding at night, she sleeps pretty much all day. Landon has been great with her, I think partly because we prepared him so well for her impending arrival (and it probably also helps that she keeps buying him little presents ;)). Everyone told me he would regress and be jealous and not like his new little sibling, but that really has not been the case at all - I am so impressed with how he is with Blair, he is very careful and gentle around her and really doesn't try to touch her or play with her at all yet. He (not surprisingly) loves to help out with her, his big brother tasks right now include throwing away her dirty diapers, handing me new diapers, helping push her stroller, and reporting that "she's okay" when I ask him how she's doing in the car. He can't pronounce L's yet so he calls her "baby Bear" and makes cute little comments on whatever she's doing like, "baby Bear's drinking milk" or "baby sister is sleeping in her basket" and yesterday when she let out a little baby sneeze I hear Landon from the other room yell out, "Bless you Bear!"  
But the past 2 weeks have been hard. Landon stayed at my FIL's while we were in the hospital for 3 days, and missed lots of naps, some school and therapy. We got hit by a tornado, lost power, and had to check into a hotel on day 3 home from the hospital. So he's basically been thrown all over the place, sleeping (not sleeping well) outside his own bed, having everyone else other than me feed/bathe/play with him, and with all the commotion of a new baby, never ending errands, visitors, and crazy schedules all around, he's been unable to take his (very necessary) afternoon naps lately, which makes for a very cranky, and difficult to manage, kiddo. 
I definitely feel guilt over all this and I know his behavior lately has everything to do with my inability right now to cater to his schedule. I miss being able to spend time with him. I miss getting under the covers with him and reading him bedtime stories and putting him to sleep. I miss sharing lunch with him. I miss taking him to the park and going for walks and making crafts with him. But right now Blair is nursing every 2-4 hours for sometimes an hour each time and I just can't physically be present for both of them right now at this point in her young life. I know that soon I will have her going longer and longer in between feedings and I will be able to work out giving each of them my undivided attention, and to say I'm very much looking forward to that day would be an understatement.
But even now at two weeks in, I feel confident moving forward he'll get back to normal. Beginning today, I'm putting him back on a nap schedule after school from 1-3, and his bedtime of 8/8:30pm. He'll be eating better - there's been much more junk food than I like to admit and giving into his cookie and chip demands to appease him during this transition - and starting this week we'll be reintroducing the potty, which hopefully we will have mastered by end of next month. 
As for me? I have no idea when the next time is I'll feel well rested. But I'm enjoying this time with Blair, I love breastfeeding and the strong bond that we've created, and I feel so much more confident the second time around with a newborn. I made it out in public with her just a few days after we came home from the hospital (but still have yet to make it out in public with two kids by myself - definitely the true test). But I feel like I've got a lot on my plate with two kids now, constant things to do around the house and yard, more laundry than can you can imagine, an ever-growing to-do list, and I've been stressing out about where we will be living when we have to move out of here by February. 
Aside from all that, I am extremely thankful for this time in my life, a healthy, beautiful little girl who is going to start growing (fast) right before my eyes. For sweet little Landon who is stepping up into his big brother shoes like a champ, and for my wonderful husband who works so hard to allow me to stay home and enjoy this precious time and fleeting moments with my two babies. I've been beyond humbled and grateful for the outpouring of love, help and generosity our family and friends have shown us these past few weeks, and my heart has truly never felt more full. I'm taking it all in, one day at a time. The weather has been horribly cold - I can't believe it's actually snowing right now - but I'm enjoying spending the days inside, toasty warm with our heat at a constant 72 degrees, our fake fireplace roaring, the glee holiday station on Pandora playing nonstop on my computer, and slowly but surely settling back into our lives and the reality moving forward as a new family of four. 
<3

Cord Blood Banking & Britax Car Seat Giveaway!

I blogged about cord blood banking a few months ago (here) and am back today with another follow up post to tell you about our experience and to re-emphasize the importance of cord blood banking. 
We had a really, really good great experience using LifeBank USA to donate Blair's cord blood and will hopefully be using them again to store for ourselves with future baby Bauman #3. (We donated for both Landon and for Blair, but banking any baby's cord blood can be utilized on any blood relative, not just that one child). LifeBank was awesome to work with, we got our request and paperwork processed right away (before our extremely approaching cut off date), and the process at the hospital to donate the kit was super quick and easy. All I had to do was bring the cord blood kit box in with me to the delivery room, and the nurses took over with all the instructions from LifeBank. Basically all they had to do was take 4 vials of blood from me, check off a few administrative notes, package up the tissue, placenta, & cord blood after delivery, and all I had to do was call LifeBank within 2 hours of her birth to have a representative come pick up the box. I was a little stressed out about the whole process beforehand but everything turned out to be very simple and uncomplicated and very easy on me.
If you don't know anything about it, there are soo many reasons to preserve your baby's cord blood, or otherwise donate it. Through cord blood banking, you can collect and preserve potentially lifesaving stem cells, and doing so could one day save the life of your child or a blood relative. The ability of stem cells to save lives via cord blood banking has proved successful for replacing abnormal or diseased cells, and treating life-threatening blood disorders such as leukemia, lymphoma, and myeloma. In fact, 1,988 stem cell transplants have been used to treat some 80 diseases.
You can bank even more stem cells by collecting them from 2 usable sources of stem cell-rich blood: the umbilical cord and the placenta. This service is called Placental and Cord Blood Banking and it is available only through LifeBank USA. Whether you choose Placental and Cord Blood Banking or Cord Blood Banking alone, there are still many other reasons to choose LifeBank: LifeBank is the only company that offers cord blood, placenta blood, and tissue banking, and they are also the first to release placenta-derived stem cells for a successful transplant. They have been absolutely wonderful to work with and they will collect cells from anywhere in the US. Another reason to bank with LifeBank? They include tissue banking (tissue from the placenta) for free. Placental tissue contains mesenchymal (MSCs) and MSC-like cells. While stem cells found in cord blood and placenta blood have been used to successfully treat patients, there are currently no approved uses for stem cells derived from the umbilical cord or placenta tissue. Possible therapeutic applications are in early research stages and LifeBankUSA's parent company is actively involved in their development. LifeBankUSA will store the placenta tissue for you as part of their banking package using their cryogenic tanks for long-term preservation. In the event your baby's tissue cells are ever needed for future therapies, the tissue may then be processed and cultured using available technology at the time. Banking with LifeBankUSA will definitely give you peace of mind, knowing that this stem cell-rich blood can be used to treat certain diseases in the future.
Along with peace of mind, LifebankUSA is also now giving away THREE top rated, Britax Marathon 70-G3 Convertible Car Seats in a random drawing. The value of the car seat is $231.99 each.  To enter this contest all you have to do is simply "like" LifeBankUSA on facebook. Good luck!!


Tuesday, November 19, 2013

Blair's Newbie Pics :)

Been pretty busy over here with 1 week old baby Blair and have my parents in this week but I wanted to quickly drop in and share some of her newborn photos taken at the hospital when she was 1 day old. Enjoy :)
She has officially captured our hearts and we couldn't feel more blessed.....Will hopefully get a more detailed blog post up on how things are going and how Landon is adjusting at some point. But for now, I'm enjoying this special time and taking in every moment with this little angel <3

All photos taken by Bella Baby Photography

Nursery Tour :)

Baby's nursery is *finally* completed and I'm a very proud mama bird of how her little nest turned out and I love this room so much. I definitely had so much more fun picking things out and decorating for our little girl than I did with Landon's nursery, (which looking back on was actually really boring, sorry L!) My whole pregnancy I swear I knew we were having a girl so I started planning and collecting little things for her ever since the positive pregnancy test. I really love this little space, and sometimes when the babes are sleeping and I have some free time I find myself making my way to her room, sitting in the rocking chair and rocking myself back and forth with a cup of tea or my computer, or sometimes just sitting and thinking quietly to myself.
This room is really teeny, which we renovated from an old music studio. It had no closet so we Chris built the shelving and clothing rack and hung up some yellow gingham curtains for closet doors (also did these curtain closet doors in Landon's 'big boy' room). The crib and changing table were the only things we have in here passed down from Landon, and I tried really hard not to spend much money on everything else. I'm actually really proud of all the re-purposing and recycling I managed in here - The rocking chair was Chris' mom's (the same one she used in her kids' nurseries), the end table and wooden heart wall shelf Chris' dad left here for us. And mostly everything in here minus the crib and changing table she will take with her to a 'big girl' room someday. 
All other sources for all other decor items are at the bottom of the post, lots of gems from Homegoods, etsy, & Tar-jay ;) 

SOURCES:
Ottoman: Overstock.com
Bookshelves: Built from scratch :)
Lamp: Target
Storage Cube in closet: Target
Baskets in storage cube: Target -- I just tied white satin ribbon bows around the handles to dress it up a bit
Straw hamper in closet: HomeGoods
Straw basket in closet: HomeGoods
White wire baskets in closet: HomeGoods
Moccasins: Freshly Picked
Happy Cloud Pillows: Etsy, shop Ohnorachio **Use promo code "YAY10" for 10% off your order
Baby bag: Vera Bradley "Summer Cottage" print
Sheepskin rug (used as a throw over rocking chair): Rugsusa.com. (Wait for holidays for their 65 and 75% off sales)
"Live Simply" print: The Painted Arrow
"Be Filled with Joy" print: etsy, shop: The Wheatfield
Baby name wire hanger: etsy, shop: Burlap Babe
Elephant print: etsy, shop: Oanabefort
paper lanterns: justartifacts.com (10'', 12'', and 14'' -- only 2$ a piece!)
Crib skirt: amazon.com
Crib bumper: A pass-me-down from my SIL but originally from The Land of Nod
Gold dot crib sheet & changing pad cover: The Land of Nod (crib sheet / changing pad cover
Hanging planters: etsy shop: My Little Plants (baby succulents from Home Depot, 2$ a piece)
Mother Teresa print on side table: etsy, shop: Unraveleddesign, another post on this prayer here
Organic wooden hedgehog on side table: Local indie craft fair - The shop is Tree Hopper Toys
Wooden tulips on side table: Local craft fair - do not remember name of artist, sorry!
Pink "table runner" on side table: Anthropologie (clearance bin for $2! - Supposed to be a cloth placemat)


Related Posts Plugin for WordPress, Blogger...