

You know I love giving handmade things so I thought in the spirit of the season I would finally get up this DIY post on how to make your own container candles! I have made these for so many gifts the past year - I think a nice candle is a gift everyone loves and will use and you really can't go wrong with. I just made a new batch to add into some Christmas gifts and for Landon's teachers' Christmas gifts, so these ones are holiday-themed, but you can totally use different scents and ribbon and make them perfect for any occasion - housewarming, new mommy gift, Mother's Day, teacher appreciation, thank you gift, a just because I love you gift, or just for yourself ;)
Here's What You Need:
- Candle wax - I use soy wax to make my candles, a little bit more expensive than the regular paraffin wax, but it is longer lasting and much more environmentally friendly. And plus if you've got new babies laying around breathing in these candle fumes, make them safe! (Side note - I bought a huge ass bag online but you can get smaller ones if you aren't going to make a lot and craft stores typically carry too).
- Double boiler (I found mine cheap on ebay but I would imagine they aren't hard to find at any store. If you don't have one you can make a fake double broiler with some metal canning rings)
- Metal pouring pitcher. You can find these cheap on ebay, here's an example of one I just found on amazon so you get an idea.
- Thermometer
- Wick assemblies and tacky wax (again, got mine online at Amazon, but can be found ay any craft store. You don't need a lot of tacky wax - 1 oz pk is more than enough!)
- Candle scent (I used essential oils because I really wanted my candles to be completely free of any dyes and artificial scents. My favorite essential oils for these candles are peppermint, or a peppermint blend, lavender-mint or rosemary-mint).
- Candle dye (Optional, if you don't want white candles).
- Containers (I used these Ball Mason jars - 8 pks at Target for only $8.00)
Directions:
1. First step is preparing your jars. You can use anything that will withstand heat. As mentioned above, I used mason jars and think they look amazing. Put a dab of your Tacky Wax on the bottom of the wick piece and stick it to the bottom of your jar nicely in the middle. If you're using a large jar like these mason jars, using scissors or butter knife helps to press it down there hard so it sticks and doesn't move around when you pour the wax in.

2. You're ready to cook your wax. I used a medium-size stainless steel pot as a base pot. Put my double broiler down, and a cheap metal pitcher on top of that. (Don't have a double broiler? You can fit three wide-mouth canning rings at the bottom, creating a makeshift rack or fake double broiler to set your pouring pitcher on. Heating wax over direct heat can cause overheating and possibly a fire, so don’t do it! Make sure you have a double broiler or makeshift one).


3. Pour water inside the base pot and heat the wax to the degree directed for your specific wax. There's no need to stir or break apart chunks. As the wax melts, it will all come out on its own. I actually didn't even check the temperature of my wax - once it completely melted I took it off.
4. When the wax reaches its pouring temperature, or whenever it completely melts, you can add your candle dye, which comes in liquid or solid form. (The dye package will direct how much to use). If you’re using solid dye, you can cut it up before adding it so that it will melt faster.
5. After the dye is mixed in, turn off the heat and quickly add the scent. You can use one scent or a combination to create custom scents. I used essential oil combinations to make cinnamon-vanilla and patchouli-lime, and lavender-mint and rosemary-mint. All smelled amazing! If you do use essential oils, you will need to add in a lot to make your candle actually smell when you burn it.
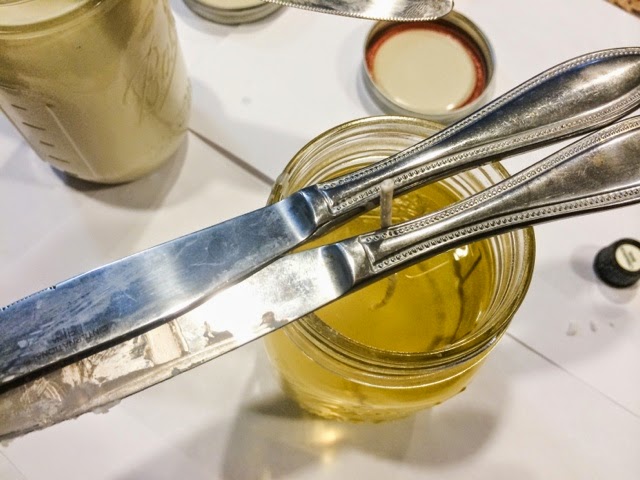
6. Pour the wax into the containers (reserving some extra wax for topping off later). Be careful to keep your wicks centered. - I used knives positioned across the tops to keep the wicks in place until the wax set.
7. Let cool for 30-45 minutes. Reheat reserved wax to pouring temperature then top off the candles to fill in any air bubbles or unevenness.
It's worth mentioning now that the color of your hot melted wax will not look like that color when it's dried. I didn't add in any candle dye to mine because I like them white and they look like a really ugly yellow until they completely dry and harden:

8. You're done! You can personalize with a label or ribbon and gift away! I used baker's twine (can find at any craft store) and some jingle bells (50-pk at Dollar Tree Christmas section).

So there you have it! I hope you guys try these - it sounds intimidating but once you do it I promise you'll think it was so super easy and you're going to want to keep making more!
Happy Homemade Gift Making!!

Wow that looks soo cool!
ReplyDeleteThese are so cute!!
ReplyDelete