Showing posts with label DIY. Show all posts

Tuesday, October 17, 2017

Make your own Natural Deodorant Spray (that works!!)

I've been trying store bought natural deodorants for the past several months now and have been super unhappy with them - they either don't work, are too pasty/messy, or have too painfully irritated my skin. SO after some research and trial and error I have come up with a super simple, all natural deodorant spray that REALLY WORKS.
First thing I want to run by you is the importance of switching to a more natural deodorant - almost all conventional deodorants contain aluminum as the active ingredient, which is a known neurotoxin that has been linked to cancer and Alzheimer's. And this is put right under our arms, where many lymph nodes lie close to the skin. Aluminum effectively blocks our sweat glands, which is why they all use it, but the odor only comes when bacteria mixes with sweat. Sweating is your body's natural way to detox and to rid your body of toxins, really what we should want to do is not block our body from detoxing, but to prevent bacteria growth. And with certain anti-bacterial, anti-microbial, anti-inflammatory essential oils, you can make your own deodorant spray that is 100% natural and that still allows your body to detox, and that works.
For sake of this post, and any of my DIY posts, the only brand of essential oils I use and trust for myself and my family is Young Living. (If you are interested in Young Living oils, I'd be happy to talk with you more about them and get you started! Please feel free to email me at mummascorner@gmail.com!) My recipe is fairly simple - I left out baking soda because it can irritate your skin, and does in fact irritate my own skin, but baking soda does have super duper effective deodorizing properties, so if you feel like you need a little extra deodorizing and can cringe through the initial sting, feel free to try adding about 1 tsp of baking soda to this.
Ingredients:
-4 oz amber glass spray bottle (amber glass is the best way to store your essential oils - the glass does not absorb the oils like plastic can and the amber color protects from harmful UV rays).
- natural witch hazel (all natural, astringent, anti-inflammatory, antibacterial, and soothing. Also prevents razor burn!)
- distilled water
- ethanol (drinking alcohol, not rubbing alcohol. I used 80 proof or 40% alcohol)
- Himilayan salt. (Salt is known for anti-bacterial properties and inhibits the growth of odor causing bacteria and also helps the essential oils bind because they will not mix with water or witch hazel alone).
- 12 drops of each of the following essential oils: patchouli, lime, grapefruit, tea tree, and clary sage. These are all the best eo's with the highest antimicrobial, antibacterial, and antifungal properties.
Directions: Fill your amber glass bottle half way with witch hazel. Then fill up to about 3/4 full with the ethanol. Add your essential oils. Add your Himalayan salt.  Then fill to top with distilled water. Shake well and apply as often as necessary. It can last all day but every person is different and have different bodies and different levels of exercising so depending you may apply once in the morning, or also again mid afternoon.

Hope you guys try this! Don't have the time or ingredients to make this yourself? I am now selling on my etsy shop for only $12! (View listing here). I also have a 2 oz plastic bottle listing in the drop down, perfect for traveling. You can use code "FREESHIP" for free shipping :)

Monday, September 19, 2016

Homemade Blemish Spot Treatment Rollers with Essential Oils

Wanted to highlight a new item up in my etsy shop and teach you how to DIY too! These are awesome blemish spot treatment roller bottles made with the best essential oils for acne with the highest anti-bacterial, anti-inflammatory, soothing and healing properties. I use this all the time when I start to feel a pimple coming on and usually it won't even surface. (It's that amazing!) If one does surface, I apply this afterwards and the problem area is completely reduced in appearance and redness in a matter of a day. The small little roller bottle can conveniently travel with you anywhere -- I even keep one in my purse in addition to the my make up bag in my bathroom. And best of all, it's completely chemical-free and 100% plant-based and natural.
(If you ever have any questions about essential oils or starting your own membership, please contact me at mummascorner@gmail.com and I'd be so thrilled to talk to you about it more!)
What You Need:
- 5 ml amber glass roller bottle
- 6 drops tea tree essential oil
- 2 drops frankincense essential oil
- 1 drops lavender essential oil
- 1 drops bergamot essential oil
- 1 drops clary sage essential oil
- even amounts of witch hazel and jojoba to fill
Directions:
1. Drop out specified amounts of essential oils into your dropper
2. Fill to top with equal amounts of witch hazel and jojoba oil
3. Shake well before use. Apply as often as necessary to problem areas, before or after they arrive!

Wednesday, June 1, 2016

DIY Sunscreen with Essential Oils

Well it's June 1 and we're already out spending most of our days outside in this gorgeous weather we've been having. For the first time I started experimenting with a DIY sunscreen with some of my oils and really love the way it came out! It's very simple to make and is completely customizable to a variety of oils you have on hand. Here is the handy chart I used as a reference guide when making mine:
I filled a 2oz amber glass spray bottle with:
- 3/4 coconut oil (which has an SPF of 4)
- 1/4 sesame oil (which has an SPF of 6) 
- 4 drops lavender eo (SPF 6)
- 4 drops peppermint eo (SPF 7)
- 10 drops carrot seed eo (SPF 30-40!).

 
It smells great and the peppermint has additional benefits to your circulatory system and amazing benefits for your muscles and skin tone. And  of course, best of all, this is 100% natural!! So I have no guilt spraying and rubbing this all over me and my pregnant belly. BUT, because of the coconut oil, I do not put this on my face. Coconut oil is comedogemic, meaning it can clog your pores, so I'm still on the hunt for a good (natural) facial sunscreen, let me know if you have any recommendations! 
Happy & Safe tanning and fun in the sun! 
*Feel free to email me at mummascorner@gmail.com if you have any questions about essential oils or are interested in starting your own wholesale membership (& joining an amazing support team of oily enthusiasts!:))

Wednesday, September 2, 2015

DIY Magnetic Chalkboard

What I had hanging iny kitchen "Before":
And our new Magnetic Chalkboard "After":
With my son starting kindergarten (I know...what!) this week and the past few days in the 60s, I am all in super amped up back-to-school and organization mode. Just completed this DIY project (that was kind of hanging over my head for a while) to help bring a little more aesthetically pleasing organization to my kitchen slash life....I love the idea of a magnetic chalkboard because it serves the double purpose of being able to hang all.the.things that clutter my life kitchen - invitations, calendars, pictures, Landon's beautiful art work, school notices/reminders with magnets, as well as give you the ability to write your own notes, to-do's, quotes, lists, reminders, or even full fledge calendar with easily erasable chalk. With a stainless steel fridge, I had no place to hang all these things, and looking to buy my own in the large size I wanted was hundreds of dollars! SO I made my own and it was really easy enough for anyone to do. Other ideas of places to hang other than your kitchen: above a child's desk, in a home office, or play room.  Total cost of making this in this large size was about $45
Here's What You Need:
- a Frame. I bought my frame from Hobby Lobby (their backless frames are 50% off every week, so this one was normally $70 that I got for $35). Mine is a 24x 36":
- Sheet Metal. I bought mine from Home Depot. They actually carried sheet metal in exactly my frame's size so it worked out, but they will cut for free if you ask them to nicely in their tool rental section :)
- Chalkboard Paint. Because the magnets will work great against the metal you don't need a magnetic primer. Chalkboard paint can be found right in the paint section at Home Depot or Lowes.
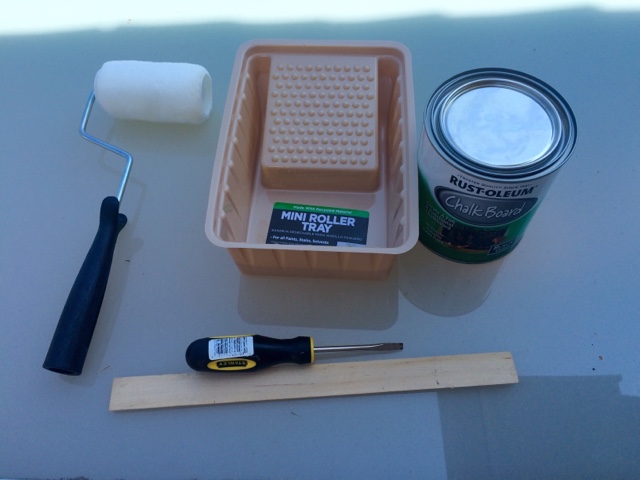
- Roller/pan. I used the small one, any size will really do. Just don't use a paintbrush. The roller allows for the most even-tone coverage.
- Optional wood backing. If you buy a backless frame like I did you might want to get some additional wood backing for more support. You can put the painted sheet metal in without it, but the guys at Home Depot helped cut me down an additional thin wood backing to provide a little more support/baking, which I am really happy with. If you buy a frame that already had a backing you can use that. You will also need Bracket clips or nails to nail in the backing.
- Mount. Any mounting hardware will work.
Directions:
1. Paint your sheet metal. Wait for each coat to dry completely before painting another coat. I did a total of 4-5 coats.
This picture above is what it looked like after the first coat- even after the second it will still have some metal showing through, make sure you let dry completely before you start your next coat and do a good 4-5 coats.
2. Cut down sheet metal to size (can have them do this for you at Home Depot), and insert into frame.
3. If using a backless frame, cut down wood backing to size and nail in to secure into frame.
4. Hang mount according to package directions.
5. Hang up your new magnetic chalkboard and de-clutter your life and get organized for the school year!


Tuesday, May 19, 2015

DIY Surf Spray for Beachy Waves


Wanted to share with you all today a super simple, super cheap, & effective DIY surf spray for those popular beach waves everyone is doing. I recently chopped 8 inches off my hair to sport the new 'lob' 'do, which I absolutely love! It is so easy to style and in my opinion looks the best when styled with these loose beachy waves. I bought Bumble & Bumble's Surf Spray right after my haircut, but for $25 a small bottle, I figured out how to make a very similar spray which will cost you next to nothing, and made from all natural ingredients and no chemicals! Many of the sea salt sprays are also drying to the hair, as salt pulls moisture and natural oils out, but this recipe contains epsom salt (which is less drying), as well as coconut oil, which is sooo good and hydrating for your hair.

This is a super simple recipe you can make at home, and it literally costs about 1/50th of the store bought versions. It adds great texture and volume to your hair without the chemicals, and If you make it yourself, you can customize to your hair type to get the texture you want! I use this all the time to style my new 'do -- I spray all over hair when damp, rough blow dry or air dry, curl a few small sections of hair with a 1" or 1.5" curler, and then spritz again as a finishing spray to lightly hold (SO much better than hairspray which can look greasy and crunchy)

What You'll Need:
- 1 cup hot water
- 2 tablespoons epsom salts
- 1 teaspoon aloe vera gel
- 1 teaspoon liquid coconut oil (if you don't have coconut oil you can use almond oil or jajoba oil. If you have fine/oily hair, you might not even need to add any oil - this just moisturizes and offsets the dryness caused by the salt)
- 5-6 drops lavender essential oil (lavender's my fave but I think citrus scents would also smell great!)
- 8 oz spray bottle (check out Walmart or dollar store)

Directions:
1. Dissolve Epsom salt and aloe vera gel into hot water.
2. Combine coconut oil and essential oil
3. Pour into spray bottle and shake well.
That's all! Enjoy :)

Monday, March 23, 2015

DIY Pom Pom Garland

Not wanting to hang curtains but wanting some window decor, (I was actually pretty close to buying these bulb lights, but for $60...I wanted to save money and I always prefer to make over buy anyway), so I made this cute Pom Pom garland to hang on Landon's windows. It's super fun, cheap, and easy to make - all you need are scissors, a fork, and yarn.

Directions:
1. Wind yarn around your fork, roughly somewhere around 80-100 times if you are using a regular width yarn...for some of the chunkier yarns you would only need to wrap around about 30 times:
2. String a piece through the center of the fork fingers and double-knot. You'll know you've made it as tight as it should be when it looks like the fork is wearing a turban:
3. Slide it off the fork, and use your scissors to cut through the looped yarn, and then trim throughout to round out:
4. Tie your Pom Pom to a long piece of baker's twine or yarn and hang!


Saturday, December 6, 2014

DIY Christmas Garland

Here is a really great festive and educational craft you can do with your kids and have the outcome really be for yourself - win win ;) This DIY Christmas garland is especially great to do with kids who might have some OT or fine motor planning issues, or just to practice on those areas with them, through cutting and lacing. 
All you need for this is some baker's twine, paper straws (got mine on eBay for $2 bucks), beads (check out dollar store or Michaels), and bluntly tipped children's scissors. Have your child practice cutting with scissors by slicing up the straws, (which is easier for them to do than cutting paper as all it requires is one quick cut). Then alternating between the freshly cut straws and beads, lace onto the twine until you reach the desired length of garland for your tree. 
There's so many different ways to personalize your garland depending on your tree and desired look you're going for. Since our tree has a silver and gold theme, I used silver and gold striped paper straws along with silver and gold beads, but some other ideas I love are the wooden beads with various colored paper straws, or varied shaped and sized crystal beads with white straws for a more elegant look.
There are so many ways to make this craft even more of a learning experience for them - the most obvious is through the concept of a pattern - you can discuss how you are developing repeat pieces/colors and have them pick out the next piece in your garland as you go (this is more of a higher level/4-year old skill). You can also discuss other concepts and vocabulary such as comparing lengths of the cut straws, ("taller than", "shorter than", "the same as") and introduce or practice other descriptive words like round, shiny, smooth, hard, thin, fragile, striped, etc.

Merry Christmas Crafting!

Tuesday, November 25, 2014

A DIY to Make Your Own Candles!

You know I love giving handmade things so I thought in the spirit of the season I would finally get up this DIY post on how to make your own container candles! I have made these for so many gifts the past year - I think a nice candle is a gift everyone loves and will use and you really can't go wrong with. I just made a new batch to add into some Christmas gifts and for Landon's teachers' Christmas gifts, so these ones are holiday-themed, but you can totally use different scents and ribbon and make them perfect for any occasion - housewarming, new mommy gift, Mother's Day, teacher appreciation, thank you gift, a just because I love you gift, or just for yourself ;)

Here's What You Need:
- Candle wax - I use soy wax to make my candles, a little bit more expensive than the regular paraffin wax, but it is longer lasting and much more environmentally friendly. And plus if you've got new babies laying around breathing in these candle fumes, make them safe! (Side note - I bought a huge ass bag online but you can get smaller ones if you aren't going to make a lot and craft stores typically carry too).
- Double boiler (I found mine cheap on ebay but I would imagine they aren't hard to find at any store. If you don't have one you can make a fake double broiler with some metal canning rings) 
- Metal pouring pitcher. You can find these cheap on ebay, here's an example of one I just found on amazon so you get an idea.
- Thermometer
- Wick assemblies and tacky wax (again, got mine online at Amazon, but can be found ay any craft store. You don't need a lot of tacky wax - 1 oz pk is more than enough!)
- Candle scent (I used essential oils because I really wanted my candles to be completely free of any dyes and artificial scents. My favorite essential oils for these candles are peppermint, or a peppermint blend, lavender-mint or rosemary-mint).
- Candle dye (Optional, if you don't want white candles).
- Containers (I used these Ball Mason jars - 8 pks at Target for only $8.00)

Directions:
1. First step is preparing your jars. You can use anything that will withstand heat. As mentioned above, I used mason jars and think they look amazing. Put a dab of your Tacky Wax on the bottom of the wick piece and stick it to the bottom of your jar nicely in the middle. If you're using a large jar like these mason jars, using scissors or butter knife helps to press it down there hard so it sticks and doesn't move around when you pour the wax in.
2. You're ready to cook your wax. I used a medium-size stainless steel pot as a base pot. Put my double broiler down, and a cheap metal pitcher on top of that. (Don't have a double broiler? You can fit three wide-mouth canning rings at the bottom, creating a makeshift rack or fake double broiler to set your pouring pitcher on. Heating wax over direct heat can cause overheating and possibly a fire, so don’t do it! Make sure you have a double broiler or makeshift one).
3. Pour water inside the base pot and heat the wax to the degree directed for your specific wax. There's no need to stir or break apart chunks. As the wax melts, it will all come out on its own. I actually didn't even check the temperature of my wax - once it completely melted I took it off.
4. When the wax reaches its pouring temperature, or whenever it completely melts, you can add your candle dye, which comes in liquid or solid form. (The dye package will direct how much to use). If you’re using solid dye, you can cut it up before adding it so that it will melt faster. 
5. After the dye is mixed in, turn off the heat and quickly add the scent. You can use one scent or a combination to create custom scents. I used essential oil combinations to make cinnamon-vanilla and patchouli-lime, and lavender-mint and rosemary-mint. All smelled amazing! If you do use essential oils, you will need to add in a lot to make your candle actually smell when you burn it.
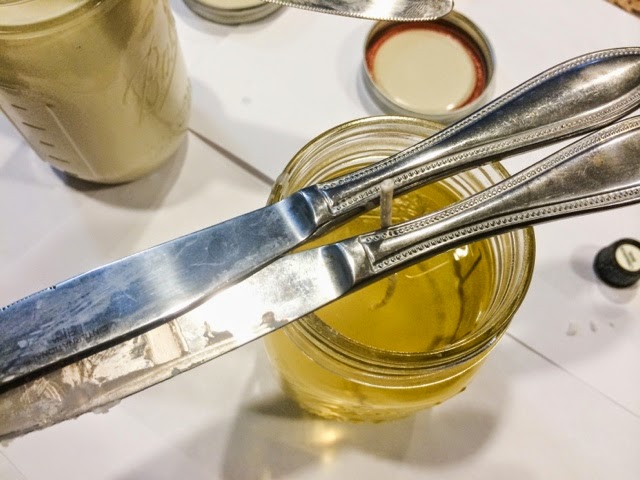
6. Pour the wax into the containers (reserving some extra wax for topping off later). Be careful to keep your wicks centered. - I used knives positioned across the tops to keep the wicks in place until the wax set.
7. Let cool for 30-45 minutes. Reheat reserved wax to pouring temperature then top off the candles to fill in any air bubbles or unevenness. 
It's worth mentioning now that the color of your hot melted wax will not look like that color when it's dried. I didn't add in any candle dye to mine because I like them white and they look like a really ugly yellow until they completely dry and harden:
8. You're done! You can personalize with a label or ribbon and gift away! I used baker's twine (can find at any craft store) and some jingle bells (50-pk at Dollar Tree Christmas section).
It’s fun to play with dyes and scents, and you can make your candle scent as strong as you like by adding more scent. You can also alter the color by adding more or less dye (or even mixing dyes). I'm thinking about buying some candle dye and experimenting with different color candles, (actually making an ombre candle!) next time. And I also think I am going to purchase some candle dye, as you really need to use a lot of essential oils to make the scent strong enough and I 'd rather save my precious oils for other needs.

So there you have it! I hope you guys try these - it sounds intimidating but once you do it I promise you'll think it was so super easy and you're going to want to keep making more!

Happy Homemade Gift Making!!

Thursday, May 29, 2014

End of School Year Teacher's Gift

Still can't believe Landon's last day of school was today! Made these lil planters for his teachers to thank them for all their hard work with him this past year. He has certainly made some enormous strides from when he started back last August and we are so thankful. 
Here's all you need to make these lil guys:
- flower pot (I did not plant and grow these myself, I got these potted gerbera daisies at Trader Joe's...$4.99 each)
- chalkboard tag ($0.59 each at Michael's)
- chalkboard marker. How I just found out about these chalkboard markers is beyond me. I used to use regular chalk to write little chalkboard signs (here & here) but these markers make it SO much easier, and much prettier. Found mine at Michaels for $12 (4-pk).
- Ribbon to prettify and gift-ify your pot and also to secure your chalkboard tag. You will need to tape down in two areas so it doesn't slip down to the bottom of the pot. I found this cute apple ribbon a while back in the clearance bin at Michaels. Any ribbon will work just fine but the thinner actually the easier to work with.
And there you have it! A simple, handmade, thoughtful and creative gift to your kiddo's teachers they are sure to appreciate :)

Tuesday, May 13, 2014

DIY monogram coffee mugs

Saw these beautiful monogram mugs at Anthro a while back and stuck them in the back of my mind. Recently saw this pin on pinterest about making your own customized plates with a sharpie marker, & I decided to try to make my own monogram mugs. Plus, I wanted to make some housewarming/new mother gifts for a few girlfriends and decided these were the perfect gift, and even better that they would be handmade.
All you need is a ceramic mug, a sharpie, and stencils (optional). Then bake in your oven at 350 for 30 minutes and ta da! The marker will set in and is now permanent, and you have yourself a beautiful, personalized mug to make your morning extra happy.

A few important notes:
- Do not put these in the dishwasher. They can handle a good hard hand washing & scrubbing, but the marker will come off a little if you dishwash. So don't do it.
- Do not preheat the oven before putting the dishware in. As soon as you turn the oven on to 350, put the mugs in with it. Otherwise, the drastic temp change will cause them to break. And you don't want that to happen.

Monday, February 3, 2014

DIY Alphabet Book

I made this alphabet book for Landon and love it so so much. It was really simple to do if you are even a little tech-savvy. I took old photos from my phone and uploaded them to the very easy to use "Color Cap" app (free) to insert the text into them. Then I uploaded all my photos to my computer & mpix, where I made the hardcover 5x5" photo book. *Note, you can add text to them on mpix directly when making the book (or any other photobook publishing site you use).
What's especially great about this book is that it is so easy for a child to read themselves (& kids love reading books they made or that are about themselves), and It's also a great tool to help Landon work on his speech at night before we go to bed. Not only does it help teach new vocabulary words and the letters they begin with, but also helps your child vocalize progressive verbs paired with pronouns, and helps them with how to answer "who/what/where" questions. For example, on the "J" page, I'll say, "What are you doing here?" And he'll exclaim "I'm jumping!" So he's doing a great job answering the "Wh-" question, verbalizing the action verb and using the pronoun "I." You can still do this even on pages with nouns. For example, on the "K" page, which is for kisses, I'll say, "Who are you giving kisses to?" And he'll say, "I'm giving kisses to mama" Or on the "E" page he'll say, "I'm playing the electric guitar with papa."
And on top of it all it's an adorable "night stand" book (instead of a coffee table book, like that?) to have on display in his room.
A few tips & tricks when making your book:
- In order to find the perfect photo for a particular letter you might have to go beyond your current camera roll. I scrolled down my old Instagram posts and saved (or took a screen shot) of old images on my phone that I wanted to work with.
- Keep text away from the left/right edge of your image or else you might lose some of it in the binding when they go to make your book.
- On a similar note, I used the "SquareReady" app to give each of my photos a white border to safeguard against any images or text getting lost in the bind.

Thursday, December 12, 2013

DIY Handprint Wreaths

Another fun and very quick (under 5 minutes) Christmas craft, these adorable handprint wreaths. All you need is a green stamp pad (make sure you have the washable kind for easy clean ups), a small stretch of red ribbon, and paper. You could also do this on a canvas or a handkerchief or whatever else you have in your little craft stash. I used a thick card stock letter paper for Landon because his hands were too big for my 6x9" canvas, but using paper will also allow you to hole punch the corners and tie some red and white twine to hang and display. 


Friday, May 3, 2013

Homemade Mother's Day Cards

Made these DIY Mother's Day cards with L for all the special women in his life. It's cute cause you have his little handprint in there, and also very easy to make: All you need is card stock paper for the card, hand, & flower stems, and little tissue paper balls for the flowers.

*Note, if you end up mailing these out, you may need to pay a little extra in postage -- about .20 more because it won't fit through as a flat envelope.

Happy Crafting! & Happy early Mother's Day to all you hard working mommas out there! :)

Thursday, May 2, 2013

Homemade Teeth Whitener

I used this homemade teeth whitener for only 3 days and am ridiculously pleased with the results. On day 4 I went to the dentist for a cleaning and the first thing my dentist said was, "you have the whitest teeth I've ever seen" and then I told him how I made and have been using my own whitener and he completely approved it and of all the ingredients. It's super easy to do and all you need is a little bit of toothpaste, water, baking soda, & hydrogen peroxide.
Directions:
1. In small mixing bowl, mix together 1 teaspoon baking soda, 1 teaspoon hydrogen peroxide, 1/2 teaspoon water, and small amount of your regular toothpaste. Here is what mine ended up looking like, Mine was a little on the watery side, if you want yours thicker simply add more toothpaste. The baking soda will also cause your concoction to fizzle a little.
2. Brush your teeth with it and then rinse your mouth out afterwards.
3. Do this about once a day for about week or until you see the results you want. (I only needed to do it for 3 days). Once your teeth are nice & white, limit yourself to using this once every month or two.
4. If you need to quick start this within a few days or aren't seeing the results you want after a week, you can also try also mixing 1 part hydrogen peroxide and 1 part water and swishing it around in your mouth after brushing your teeth before bed and then spitting & rinsing it out.


Friday, March 22, 2013

Homemade Easter Cards

Sharing some lil Easter crafts with you today since Easter is in March this year....Made these simple cards with Landon for all our relatives out of card stock paper, a few feathers, and googley eyes. 
very focused on coloring his eggs
lil chicks. Looks a lil advanced for a 2 year old, I know. I may have helped him a little by cutting out all the parts and I was also in charge of the glue. But he put all the glued pieces down into place and patted them down to stick. He would also exclaim every time, "eyes!!" and "nose!!" and when we were done, "bird!!"
front of card
inside of card

Happy Easter Crafting & Happy Friday :)

Friday, February 8, 2013

Essential Oils

I've recently become obsessed with essential oils. Ever since I started making my own skincare products and cleaning agents, I've been finding all sorts of random uses for them around the house and in my everyday life. I'm absolutely obsessed with essential oils for several reasons: first, they smell absolutely amazing (favorites: lavender & rosemary), second, the oils are extracted directly from roots, wood, flowers, fruits and/or leaves and thus are 100% pure and contain absolutely no chemicals or toxins, and lastly and perhaps most incredible thing of all is that essential oils have healing properties. Each contains certain properties to help heal certain ailments as well as promote health in specific areas.
Below is a list of ways I currently use my essential oils, a few of these I have not yet tried out yet but hope to soon:

For The Home:
- Added into homemade all-purpose cleaning agents (vinegar, water, and baking soda combined in spray bottle). Favorite essential oils to mix to this are Lemongrass, Bergamot, Lime, or Orange, or a mixture of any of those.
- Soak washcloths in Lemon essential oil mixed with water to disinfect germs
- To clean and increase shelf life of fresh fruit: fill bowl with water and Lemon essential oil. Drop fruit into water and stir.
- Carpet deodorizer: Add approximately 10 drops of Lemon, Lavender, Geranium, Peppermint, or Ylang Ylang essential oil to a box of baking soda. Mix well and then sprinkle over carpets. Let set, then vacuum.
- Home aromas: Put favorite essential oil in oil diffusers that are either plugged into the wall or in designated spot or filter on humidifier. I like Lavender, Rosemary, Vanilla, Grapefruit, Sweet Orange, Cinnamon, Peppermint, and Clove.
- Add your favorite essential oil to a spray bottle filled with water to use as an air freshener.

For Your Health (Mind, & Body):
- Apply Tea Tree or Lavender to cuts, scrapes, or scratches (or combine in water bottle and spray onto cuts/scrapes).
- For colds and sinus congestion, Lavender, Eucalyptus, & Rosemary (optional to combine with 1 cup milk or cream) and pour into hot bath.
- Grapefruit essential oil promotes focus, alertness, & helps stimulate memory
- A good mood booster & fatigue fighter is the Peppermint essential oil.
- Juniper Berry, Cedarwood, Grapefruit, Lavender, Losemary, & Lemon help soften and soothe the effects of a hangover. Blend all or some of these oils in a hot bath.
- If have a fever, soak washcloth in water with Eucalyptus, Peppermint, and Lavender and apply to face, head, or sponge bath.
- For headaches, massage a few drops of either Lavender or Peppermint onto temples.
- For sore joints/muscles, ass Eucalyptus, Sage, and/or Basil essential oils to Jojoba Oil and massage onto affected areas.
- For better sleep, Chamomile and/or Lavender essential oils aroma in room (plug in diffusers or added to humidifiers) or in sheets (when drying sheets, drop a few drops into a cloth and drop into dryer with them).

For Your Skincare, Hair, & Beauty Needs:
- Add your favorite essential oil to oil cleansing facial mixture
- Add your favorite essential oil to homemade natural facial scrub.
- To use as a skin toner: Mix 8 oz water with a few drops Lavender, Palmarosa, & Rosewood essential oils. Shake and apply to skin with cotton ball.
- Deep oil conditioner for dry hair: Mix Rosewood, Lavender, Sandalwood, Geranium, and Jojoba oil and apply to hair in hot shower. Keep in for 10-20 minutes and then rinse out.
- Add your favorite essential oil to a carrier oil for massages (coconut oil, castor oil, jojoba oil work well)
- For a body moisturizer or lotion, add your favorite essential oil to carrier oil in spray bottle (jojoba oil and castor oil work well. For dry skin try sunflower oil, or a mixture of each of these)

**If you are interested in purchasing Essential Oils, you can buy the best pure grade essential oils here!

Thursday, January 31, 2013

My {mostly} diy natural skincare & make-up

Ever since making the move over to natural skincare for my face via oil cleansing and LOVING it, I've decided to work other all-natural, mostly diy products into my other skincare regimens. Since so many of you ask me, and since I find myself having these all-natural skincare conversations almost daily, I've finally got enough information digested and tested out to put together a well informed post.

After trying a few different concoctions and other organic store-bought products I've settled into what works best for me and am very, very happy with the effectiveness, price point, and of course chemical-free-ness (esp. as I am hoping to bake another lil bun in the oven soon) I hope you can try some of these out for yourself, & let me know what you think of them!

I make my own body moisturizer, facial cleanser, facial moisturizer, toner, make-up remover, & deodorant:

BODY MOISTURIZER:
DIY: I use Fill spray bottle with oil (would recommend jojoba oil, liquid coconut oil, or almond oil), a few drops of vitamine e oil, + a few drops of your favorite essential oil (My favorites are lavender or patchouli and lime or patchouli and orange)

You can get little travel spray bottles pretty much anywhere - Target, Walmart, Dollar Stores, etc. and you can find your essential oils at any apocathery, Whole Foods, or online (I like Ananda's Apothecary but Amazon carries pretty much everything too). Whole Foods or a local apothecary is great if it's your first time buying so you can smell the samples and ask questions and talk to the store reps.

DEODORANT:

DIY: Straight up lime juice. Fill in spray bottle and refrigerate. You can either juice fresh limes or use store bought lime juice, both will work great.
A lot of store bought brands use lime or lemon juice in their deodrant already and you will find that just using lime juice will work just as well and also smells really good. I was a little doubtful and hesitant in trying this out but I am so, so happy I finally did. No more chemicals or wasting money, and I'm fresher than I ever was before, win-win-win. Seriously, try it, you'll be happy you did.

FACIAL:

DIY Oil Facial Cleanser: A post all to itself, here. & you can buy my custom facial oil cleansers here.

DIY Facial Moisturizer: I don't use any moisturizers because my OCM keeps my skin properly hydrated. Sometimes I won't wipe off all the oil completely to give a little extra moisture/glow throughout the day. Of course, drinking lots of water helps too.

DIY Exfoliator: Occasionally I will use my homemade brown sugar exfoliator. This I probably do once a month, maybe a little more frequently in the winter months.

Make-Up Remover: My oil works really great at removing both eye and face make up.

Toner: Mix 2 part Apple Cider Vinegar to 1 part water. Combine in travel container, shake well, and apply to face with cotton ball after cleansing or before applying make-up. (Read more on the amazing topical benefits of apple cider vinegar here).


SOAP:

I love Beau Savon's handmade soaps, which have all natural ingredients and contain no preservatives or lather enhancers. They smell amazing and there are so many different kinds to choose from but some my favorites are Champagne Swizzle, Crimson & Clover, European Blend, & Milk & Honey. (Great to give away as gifts too - these are beautifully packaged and can buy 4 or 5 bars at a time for discounts).
Also currently loving the castile soap from Dr. Bronner's. This stuff is amazing & just a little goes a very long way!

HAIR:

Shampoo & Conditioner: I use Pureology (the purple bottle, "Hydrate" line) which is absolutely ah-maz-ing. It contains NO sulfates and is 100% vegan and still top notch salon quality. It is on the more expensive side, but it totally pays off. One bottle will last you forever. You just need a very very small amount to get a really good lather and it leaves your hair so, so incredibly soft & sleek. 

Deep Conditioner: Coconut Oil once every month or so. 

Styling products: Moroccan oil. This is the only product I use in my hair and am a huge spokesperson for it -- It is full of protein to strengthen your hair, omega-3 oils and vitamins for shine, as well as antioxidants. You can work a tiny, tiny bit through damp hair and then blow dry to lock in moisture and nutrients, and it will simultaneously serve as a stylizing & volumizing agent as well.

NAILS:

Not all my nail polish is organic or vegan, but I recently started on two new, non-toxic, vegan-friendly brands, Butter & Scotch Naturals and love them both A LOT. Favorite Butter brand color: Yummy Mummy. How appropriate. Favorite Scotch brand colors: Roasted Mellow and Neat. You can find acetone-free removers now at mostly all convenient stores now but Butter also manufactures a nail polish remover pack that is acetone-free with more favorable scents like pina colada or almond, and Scotch a soy polish remover.

MAKE-UP:

You should note that I very rarely wear make up anymore these days. I love, love make up, but since becoming a mom, and staying home with Landon, I really only put make up on when we go out socially on the weekends. 
I have a lot of make-up, and not all my make-up is chemical-free {yet} but I will run you through my favorite products that I use most often:

Foundation:
Currently using up my Bobbi Brown foundation stick (not organic/vegan) which I really like, but have problems smearing something all over my face that is not 100% organic or vegan. It does however work really, really well, and was about $45, so am just finishing the stick. I put a little bit of my facial oil on my face first before applying so it blends better and moisturizes, and looks more natural.

I also use Lush powder foundation which is vegan and made with jojoba oil. Will also add in a little bit of my oil mixture to this to make this a more of a tinted moisturizer, which comes out amazing.

Eyeliner & Mascara: I've tried organic certified mascara but had zero luck with it (But to be honest, I've only tried Organic Wear by Physicians Formula) However, this mascara did not last long at all and ran and left black smudges under my eyes within an hour of putting it on.....I used it twice and then chucked it in the trash and resorted to my favorite "They're Real" mascara by Benefit (truly amazing) and favorite thin black eyeliner from Maybelline. 

Lips:
Burts Bees tinted lip balm in color Hibiscus. This is a staple that I always have on me, looks good with or without make up, is the perfect color, and is 100% natural.

Chanel rouge allure velvet lipstick in #42 (my fave) - not organic but I only wear for special nights out and it is truly the best lipstick product I have ever known.

For a basic chapstick at night with no color I use plain old petroleum jelly as well as Lansinoh lanolin. I know that sounds kind of gross but it is the purest thing out there and safe for even the tiniest of babies to ingest and works really well to moisturize and protect severely dry lips/skin.

Current favorite lip balm are Dr. Bronner's 100% organic lip balms (the peppermint is awesome!)

FOR BABY:


Bath Wash & Shampoo: Everyday Shea. This stuff is only $10 for 32 fl oz and a little goes a verrry long way. I've had this now for months and we still have a long way to go. It smells absolutely amazing, made up from shea leaf to moisturize & soften lil baby's sensitive skin. I love the blend of this lemon, eucalyptus, and mint for a really nice, invigorating yet also calming scent.
Also use this same brand for shampoo, either lavender or vanilla mint scented. Again, a tiny bit goes a long way. I used to buy Landon new toiletries almost every single week but since switching over to Everyday Shea, I haven't had to buy him wash or shampoo in months.


Moisturizer: Landon has ezcema so we use an intense moisturizer, Hydrolatum which I absolutely love. It is super moisturizing, and made up entirely of petroleum and purified water. It works especially well for eczema flair ups and is gluten free, steriod free, peanut free, and alcohol free. And it doesn't leave behind the greasy residue that you get with Aquaphor or Eucerin. Great, great product :)


Diaper Cream: Burt's Bees all the way. I've tried every single ointment out there (organic and non-organic) and Burt's Bees works the best by FAR and also smells so, so good. If you are looking for all-natural, some mamas like the organic Budreaux's Butt Paste - I haven't had much luck with it but I know it's popular amongst other health/product conscious mamas. I've also heard lots of mamas using Coconut Oil for diaper rash, this hasn't worked well for us but reportedly does for some.

Got any other all-natural diy or vegan products that you currently use & love? Please leave a comment and share! I'd love to hear more :)

Also, if you are interested in learning more about why you should make the move from conventional OTC skincare products and cosmetics to all-natural DIY products or certified vegan/organic products, please watch this short youtube video:


Monday, November 12, 2012

diy salt dough christmas ornaments :)

Yes I realize it's early November but we get a lil ready for Christmas around here. I was actually pulling my hair out working on some federal foreclosure cases and Landon was crying at my feet when I decided to shut down my computer and do something fun with him. & these lil ornaments were a really fun craft and very easy to make. This batch yields a ton of ornaments (about 25-30, depending on the size of your cookie cutters) so I'm planning on hanging a few on our tree and then gifting out to L's friends & relatives. Cause we're all about home-made with love gifts :)

Here's What You'll Need:
- ½ cup salt
- 1 cup flour
- ½ cup water
- Rolling pin
- Cookie sheet
- Toothpick
- Miniature cookie cutters: stars, Christmas tree, hearts, whatever your heart desires. We also made baby elephants
- Acrylic paints: Whatever colors you want your ornaments to be
- Glitter glue or glitter paint (optional)
- ribbon

Directions:

1. Preheat the oven to 250 degrees F.
2. Mix together, salt, flour, and water until dough is formed.
3. Knead the dough on a floured surface until the mixture is elastic and smooth. If dough is too sticky, sprinkle with flour, continue to do so until stickiness is gone. Do not add too much flour, this will dry out the dough and will cause it to crack before you get a chance to bake it.
4. Roll out the dough to about ¼'' thick with a rolling pin that has been dusted with flour.
5. Use cookie cutters to cut out your ornaments.
6. Use a toothpick to make a hole toward the top of the shape. Poke the toothpick into the shape, then holding toothpick straight up and down, make a circular motion as if you were stirring something.
7. Place all shapes onto an ungreased cookie sheet and place into the preheated oven.
8. Bake for 2 hours.
9. Remove from oven and allow to cool completely.
10. Paint!
*Tip: Use the handle end of the paint brush to paint dot ornaments on your trees.
*Optional: When paint is dry, use glitter glue or glitter paint to put a sparkling cover coat on your ornaments.
11. When dry, thread ribbon through hole and tie in a knot in the back.
& yes, our Christmas tree is up ;)


Related Posts Plugin for WordPress, Blogger...